Friday, 18 July 2014

Excel & OBIEE 11g on Windows - ODBC drivers Problem

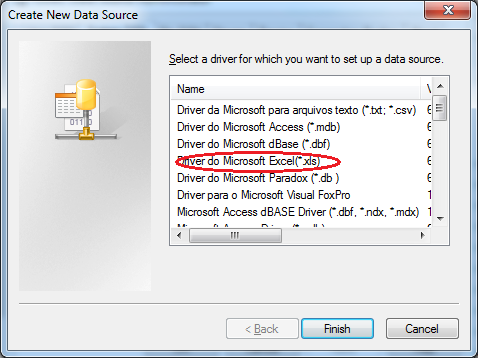
In OBIEE, you might face this issue while creating a DSN to access MS-Excel as a source database. Even if you have installed OBIEE setup, MS-Office setup successfully, etc.., you will not be able to create a DSN pointing to an Excel source on your system.

This is because, you have installed a 32 bit version of MS-Office on your 64 bit system.

A 64-bit version of the Microsoft Windows operating system includes the following versions of the Microsoft Open Database Connectivity (ODBC) Data Source Administrator tool (Odbcad32.exe):
  • The 32-bit version of the Odbcad32.exe file is located in the %systemdrive%\Windows\SysWoW64 folder.
  • The 64-bit version of the Odbcad32.exe file is located in the %systemdrive%\Windows\System32 folder.
You might be wondering.. What's this stuff?? :-) Let me try to clear you these things. 

With the Odbcad32.exe file from %systemdrive%\Windows\System32, you are not able to create a DSN for any Excel file. There will be no any drivers for Excel data source.

Unlike this, with the Odbcad32.exe file from %systemdrive%\Windows\SysWoW64, you will be able to create a DSN for Excel pointing to your source excel file. 

But you will not be able to access this DSN through BI Admin Tool.

So, to overcome with this issue, we need to install 64-bit Microsoft Access components?
You can download this component from this link, (Download 64 bit)

Install this file,


But still, didn't went well..!! Don't worry.. :-)

Use the /passive parameter to force install of the 64-bit ODBC drivers:

Open your command prompt, & go to the downloaded folder, and type the following command.

Now open Odbcad32.exe file from %systemdrive%\Windows\System32 location, you are ready to create DSN for excel source file.

Create one sample DSN,

Make sure, this DSN is available in Admin Tool also to import data from source file mentioned in that DSN.

Sucess..!! :-)

Adding Logo's to the Title of the OBIEE reports.

What if you would like to set some standard logo for that report?

Yes, there is an option in OBIEE where we can set the logo for an individual report. It is possible to add images into title of the view. This can make title views look more graphically appealing and can also help the user to understand what the title view is conveying.

You can find all the images that comes with the OBIEE installation at the following path,

C:\Middleware\user_projects\domains\bifoundation_domain\servers\bi_server1\tmp\_WL_user\analytics_11.1.1\7dezjl\war\res\s_blafp\images
  • Create any sample report.
  • Go to the results tab & edit the Title view of the report..
  • Set the title for the report. (By default, this title is same as report name). 
  • Set other fields in you are interested in further formatting.
  • In the logo, you give the path for that logo/image. It can be,
    • Relative path - The logo will accessible only on the localhost.
    • URL - A complete URL to that image.
  • Relative path - 
Note: When running in a secured environment, only resources that are located on the Oracle BI Presentation Server may be used. These resources are referenced using a relative path prefixed with "fmap:".

  • URL - 

  • For further exploration, lets fill the Subtitle & Help URL fields. 
  • Set Started Time to "Display Date and Time". This will print the latest date and time when this report is executed against the database.

You can see the question mark (?) button in the title of the report, where you can give a link to any other BI content, website, etc.

Happy blogging.

Tuesday, 15 July 2014

OBIEE 11g - Double Column support for dashboard level prompt.

Now it is possible to filter on the IDs when an end user chooses its description.

This is one feature that I am pretty sure everyone expects by default in a reporting tool i.e. the ability to pass IDs when a description is chosen in a prompt. But the way it has been implemented in BI EE actually makes it useful for a lot of applications than just description/id switch. This can be put to use for multi-language applications where the descriptions can be any language but the id remains the same.

This feature has 2 fold advantages,
  1. In OBIEE 10g, there was no automated way of filtering on ID’s when end users chose the description values in the prompts. The Double column feature provides this ability in 11g.
  2. In many implementations where data is captured in multiple languages, the descriptions might be stored in different languages. But the filtering of data will be on ID’s (which will be the same across languages). Double column feature provides that ability now.
Let's try this feature by taking one example,
  • The following is the screenshot for the table on which we will be applying this double column support.

  • To achieve this double column support, in BMM layer of repository, we need to assign the descriptor ID column for the column on which we are going to apply this feature. Here, Country_Name.

  • Save the repository and upload it on server.
  • Now go to BI Analysis page and create one dashboard level prompt. When we include this Country_Name column in the prompt, you will notice that the prompt will automatically show the Included ID column as well.

  • Notice that, we now have the ability to display the Descriptor ID as well.
    Lets enable that option as well so that users who are more familiar with the ID’s will have the ability to toggle between the Country_Name and the Country ISO Code.

  • Now create a sample report and apply a filter on the column having description. Here, Country Name.

  • Take that report and the prompt you have just created on a dashboard, end users will now have the ability to filter on the description as well as the ID.

  • If you enable the Select by ID check box, you will notice that the drop down will now have the ID and the description concatenated for easy selection.

Reference: http://www.rittmanmead.com/

Happy blogging. :-)

Friday, 13 June 2014

"[nQSError: 36010] server version 325 can not read the newer version 326 of the repository."

When you are trying to open the latest version repository using lower version of Admin Tool, you will be getting the error saying "[nQSError: 36010] server version 326 can not read the newer version 325 of the repository."

To overcome this issue, we need to downgrade the repository.

In OBIEE, we use nqgenoldverrpd.exe utility of the Admin Tool.

You can find this file on the following path,

If your are using default Admin Tool that comes with the OBIEE installation,
C:\Middleware\Oracle_BI1\bifoundation\server\bin

If you have installed BI Admin client saperately on your Windows machine,
C:\Program Files\Oracle Business Intelligence Enterprise Edition Plus Client Tools\oraclebi\orahome\bifoundation\server\bin

For this purpose of practice, we are using BI Admin client path as my OBIEE server is on Linux environment.

The parameters that nqgenoldverrpd.exe uses are as follows,

-P: Repository password
-I: Repository name along with the full path that you want to downgrade.
-O: Repository path and new name of the rep you want to name for the downgraded version.
-V: Version you would like to downgrade.

Please make sure that the database types and call interface types in the repository are allowed in the specified version.
If not, change them to the nearest types before you run this utility. Otherwise, these types will be changed to the default type(ODBC 2.0) in the generated repository.

The downgrade process,
  • Open command prompt and poing to the one of the above mentioned path, i.e.
    cd C:\Program Files\Oracle Business Intelligence Enterprise Edition Plus Client Tools\oraclebi\orahome\bifoundation\server\bin

  • The downgrade command will be as follows,
    nqgenoldverrpd.exe -P Admin123 -I D:\Sample\HandsOn.rpd -O D:\Sample\HandsOn_325.rpd -V 325
  • Once you get Done!!! message,
In output path, there will be a newly created repository having your mention version (downgraded).
Also, you can find a log file of this process in a path mentioned in -O parameter of the command.

Now try to open that repository using your lower version of Admin Tool, surely you will be in..

Happy blogging.. :)

Friday, 25 April 2014

Important Path Directories in OBIEE 11g

Wondering about the configuration files in OBIEE 11g.?? Here's some of the main Configuration/Log file locations.

OBIEE Configuration file Path :-

Catalog Path:
C:\Middleware\instances\instance1\bifoundation\OracleBIPresentationServicesComponent\coreapplication_obips1\catalog

Repository Path:
C:\Middleware\instances\instance1\bifoundation\OracleBIServerComponent\coreapplication_obis1\repository

Instanceconfig.xml:
C:\Middleware\instances\instance1\config\OracleBIPresentationServicesComponent\coreapplication_obips1

NQSConfig.INI:
C:\Middleware\instances\instance1\config\OracleBIServerComponent\coreapplication_obis1

Start-up / Stop Issues :-

You have to check the below logs if you have any start-up issues for any of your OBIEE components.
The first step is to check the status of all components using,

C:\Middleware\instances\instance1\bin>opmnctl status -l

If any of the component status is down, go to the corresponding log file for more information.
To individually start components for an example to start the presentation services you would use the below command,

opmnctl startproc ias-component=coreapplication_obips1

Similarly to start other components replace the coreapplication_obips1 with correct names.

OBIEE System Component Log Locations :-

Presentation Services:
OBIEE_HOME\instances\instance1\diagnostics\logs\OracleBIPresentationServicesComponent\coreapplication_obips1

sawlogo.log - Fro any issues related to Presentation Services start/stop

BI Server Component:
OBIEE_HOME\instances\instance1\diagnostics\logs\OracleBIServerComponent\coreapplication_obis1

nqquery.log - For any issues related OBIEE Analysis & RPD issues
nqserver.log - For any issues related to Server Component start/stop

BI Scheduler Component:
OBIEE_HOME\instances\instance1\diagnostics\logs\OracleBISchedulerComponent\coreapplication_obisch1

nqscheduler.log - For any issues related to Scheduler Component start/stop

BI Cluster Component:
OBIEE_HOME\instances\instance1\diagnostics\logs\OracleBIClusterControllerComponent\coreapplication_obiccs1

nqcluster.log - For any issues related to Cluster Component start/stop

Java host Component:
OBIEE_HOME\instances\instance1\diagnostics\logs\OracleBIJavaHostComponent\coreapplication_obijh1

jh.log - For any issues related to Java Host Component start/stop

Weblogic Server Log Locations :-

BI Managed Server:
C:\Middleware\user_projects\domains\bifoundation_domain\servers\bi_server1\logs

bi_server1.out - For any issues related to bi_server1

Admin Server:
OBIEE_HOME\user_projects\domains\bifoundation_domain\servers\AdminServer\logs

AdminServer.log - For any issues related to AdminServer

Thursday, 24 April 2014

Authenticating Users Using an External Database Table

You can choose to maintain lists of users and their passwords in an external database rather than in the repository. An external database table consisting of user login information has been provided so that you can import this information into the repository and use it to authenticate users during login.

The table contains a list of users, their logins and passwords, and the group they belong to. Optionally, the table can also contain the logging level for each user, Web interface information, and the names of specific database catalogs or schema to use for each user when querying data. After this information has successfully been imported, you need to create an initialization block that retrieves this data.

Create an sql file to create the oracle database table for external authentication as shown below:

CREATE TABLE "SECURITYTABLE" 
   (
"SALESREP" VARCHAR2(24 BYTE), 
"USERNAME" VARCHAR2(32 BYTE), 
"PWD" VARCHAR2(16 BYTE), 
"GRP" VARCHAR2(24 BYTE)
   );

Insert following values for sample.

Note:
Each user listed in this table is a member of the Sales Rep group, except for Ellen Abel, who belongs to the Sales Admin group.
Using a table of users in an external database allows you to maintain a single list of users for multiple repositories. Although the groups must be entered into the Administration Tool manually, it is easier to set up 100 groups than it is to set up 50,000 separate users.

Import the SECURITYTABLE table in your repository.

Create an initialization block. This initialization block will populate session variables with data values returned by querying the database each time a user logs in.
  • Select Manage > Variables.
  • In the left pane, select Session > Initialization Blocks.
  • In the right pane, right-click and select New Initialization Block.
  • In the Name field, enter Security.

In the Default Initialization string field, create an initialization string that populates group, username, password, and log level variables. You define the variables in a later step. 

The values returned by the database are assigned to the variables you define. These variables are used to authenticate a user during login. Enter the following into the Initialization string field:

select GRP, SALESREP, USERNAME, 2 from SECURITYTABLE where USERNAME = ':USER' and PWD = ':PASSWORD';

Create the variables. Because you requested data for four variables in the string, you need to define each variable. The variables are Group, DisplayName, User, and LogLevel.

Click Edit Data Target.
  • Click New.
  • Enter Group in the Name field.
  • Click OK.
  • Click Yes to acknowledge that this variable has a special purpose.
Repeat the process for the remaining three variables. The order of the variables is important. You must list variables in the same order as the columns in the SQL statement.

Ensure that, your screen resembles the following screenshot.

Check Global Consistency for any errors.

Save the repository.

Upload it on server and restart BI Services.

Open BI Analysis and check whether you are able to log in using any of the user from your external database table "SECURITYTABLE".

E.g: User Name: EAbel
       Password: ea

Happy blogging.. :-)

Sagar Tippe.

Wednesday, 23 April 2014

Setting LOGLEVEL from Answers in OBIEE

Run an analysis?? Want to see the SQL / Query Log generated by OBIEE server??

Here you can get trick to temporarily enable the logging level. Then you can be able to see the query log.

Normally, we check query in NQQuery.log file or from Answers also we can check the query directly.

If it’s directly from Answers (go to Administration > Manage Sessions.

If we are unable to see the log file or if we find any error message saying that, No Log found while trying to watch the query in log.

Here, the first thing you need to check is LOG LEVEL. When creating rpd, by default log level takes 0 values for Administrator user.

Using Administration Tool,

  • Manage > Identity
  • Double-click  the User for which you would like to set the Log Level.
  • Set it to 2 or more level accordingly, such that, the query will be appeared.

You can get the detail of available Log Levels in OBIEE at the below link,
http://obieenow.blogspot.in/2014/02/different-logging-levels-in-obiee-11g.html

Using Answers, (This is temporarily, for that current session only)

  • Stop your BI Server service
  • Delete the content of NQQuery.log completely, save file.
  • Start BI Server services.
  • Open BI Analysis and run any simple report.
  • Go to advanced tab.
  • Within Advanced SQL Clauses, Scroll down to see the option: Prefix
  • Here write SET VARIABLE LOGLEVEL=2; (semi-colon at the end is must)


  • Now click on Results tab to re – run the report.
  • Now you go Settings > Administration > Manage Sessions
  • Click on View Log to view the query. Now you are able to see the query and according to the LOGLEVEL you have set.
  • Go back to Advanced tab, observe the Logical query.
  • Before SQL, you find the text you written in Prefix field.

  • By mentioning the semi colon, BI Server executes these statements one after another.