- Hardware Requirements
- Download of Installation Files
- Prerequisites
- Creation of the Middleware Home directory
- Libraries for Linux Red Hat
- Ulimits
- Creating an RCU on Database
- OBIEE 11.1.1.7 Installation
- Unzip the installation files on Linux box
- Start the installation process
- Specify inventory directory
- Installer starts main GUI for installation
- Step 1: Installer release Notes etc
- Step 2: Software updates
- Step 3: Installer Type: Simple Install
- Step 4: The prerequisite checks starts here
- Step 5 : Specify Installation Location
- Step 6: Weblogic User and Scale Out
- Step 7: Select Components to Install
- Step 8: Fill in Database Details related to RCU Created
- Step 9: Oracle Security Updates
- Step 10: Generate a Response File (Silent Install File) & Summary
- Step 11: Installation Has Started Copying Of Files
- Step 12: Installation Has Started Configuring OBIEE
- Step 13: Installation Result Summary Screen
I. Hardware Requirements
Hard Disk required
around 40 GB (Including installation files etc)
RAM = 4 GB Minimum
RAM = 4 GB Minimum
II. Download the installation files

Libraries for this installation are available from here if any are missing.
III. Prerequisite
On Linux,
running Oracle Business Intelligence 11.1.1.6 Installer as the root user is not supported.
Make sure there is a user available with the oinstall group
and dba group memberships assigned.
Create MiddlewareHome Directory in a location where there is sufficient
space available.
Use the command df –h to check space available to you for the install and space for the installation files.
Use the command df –h to check space available to you for the install and space for the installation files.
When you have found the directory where you would like to install then create a middleware home.
IV. Creation of Middleware Home Directory
Log in as root and make a new directory as follows,
mkdir -p /MiddlewareHome
chown -R wishtree:oinstall /MiddlewareHome
chmod -R 775 /MiddlewareHome
chown -R wishtree:oinstall /MiddlewareHome
chmod -R 775 /MiddlewareHome
When installation starts it will run a prerequisite check on the system
to make sure all libraries needed for the install are available. You can either
use YUM or the above link in the document to download the required libraries
identified during the prerequisite check.
V. Libraries for Linux
If Libraries need to be installed cancel the install – Download and
install the libraries using the commands below:
To install: rpm –ivh <package_name>
VI. Ulimits
Set the Ulimit Parameters (Soft and Hard Limits)
set the /etc/security/limits.conf file
oracle soft nofile 4096
oracle soft nofile 4096
oracle
hard nofile 65536
If you have set the Ulimits in the conf file
above then the Linux instance will need a bounce for the settings to be set on boot up.
To set ulimit, you can execute the
below command, log in as root,
Ulimit -n 4096
To see if you have set the ulimit
correctly the command to use is :
ulimit –a | grep open
VII. Creating an RCU on Database
As we are running OBIEE on Linux 64 Bit platform, we have to create the RCU from a Windows Machine. We are using windows 7 for
this. This utility can be run any time prior to the OBIEE installation and the
database user must have sysdba privilege on the required database. Database
version we are using is 11.2.0.2.0.
- Start rcu.sh

2. Click Next.

3. Fill in the relevant details.
This can be found in the tnsnames.ora file for the database that you want install the RCU on.
Click Next.

4. Ignore the Warning for database supported versions.

5. Select Create to create a new schema in database.

6. Click
Ok when operation is completed.

7. Click Oracle Business Intelligence and click Next.
Make a note of the Prefix.

8. Click Ok when
operation is completed.

9. Select Use passwords for all schema. Set the password for both the schema which you are going to create in your database.

10. Make
a note of your schema Owners and Click Next.

11. Click Ok to confirm the Tablespaces.

12. Create Ok when operation completed.
13. Make sure summary is ok and you have taken down
all notes and click Create.

14. You will get a completion Summary. Click Close.

That's it. If you login to your database, you will see 2 schemas with their objects have been created ready to support your OBIEE main installation.
VIII. OBIEE 11.1.1.7.0 Installation
Unzip the installation files on the Linux box
When you issue the first unzip command it will create a bishiphome
directory and with increate sub directories for the disks.
If
you do not have enough disk space on the Linux box you can keep deleting the
installation zip files after you unzip them.
1. Navigate to the following directory on the server.
Initiate the installation by giving the
following command on the server,
./runInstaller

2. Specify Inventory directory.

3. Deselect "Continue installation with local inventory" and then Ok.

4. Step 1: Install release notes, etc. Click Next.

5. Step 2: Skip Software updates if you want and click Next.

6. Step 3: Click Simple install and click Next.

7. Step 4: If any prerequisite check fails, then Cancel the installation, make them correct and restart the installer. If succeed, click Next.

8. Step 5: Point to Middleware Directory Created earlier on
install guide. And Click Next.

9. Step 6: Fill in Weblogic and your password. Click Next.

10. Step 7: Select components to install. Click Next.

11. Step 8: Fill in Database Details related to RCU Created.
(For DEV_BIPLATFORM)

The same for MDS and & BIPLATFORM schemas created in
RCU Process.
Fill in Database Type : Oracle Database Connect String : Description as
above.
BIPLATFORM : Schema as created when creating RCU and password used.
Click Next.
BIPLATFORM : Schema as created when creating RCU and password used.
Click Next.
12. Click Next for DEV_MDS schema accepting defaults. Click Next.

13. Step 9: Deselect Support check box as follows and Click Next.

14.Click Yes.

15. Step 10: Generate a response file (Silent Install File) & summary.
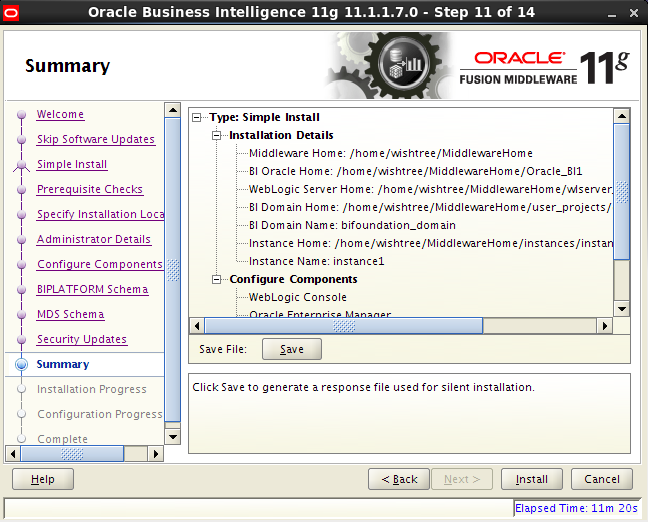
Here you can generate a response file (Silent Install File) Click Save.
You can use this file for another installation if needed.
16. Step 11: Click Install.

Install stage of copying files has started, post install
scripts and one off patches etc.
Once at 100% the copying is complete.
17. Step 12: Installation has started configuring OBIEE.

This is where the Installer is Configuring OBIEE 11.1.1.6
and Weblogic and Fusion Middleware etc. Make sure everything is Success,
and then only everything will be working as expected. Click Next.
18. Step 13: Installation Result Summary screen.

Save the Completion Summary to the box and copy all the
URL’s Needed etc to launch OBIEE.
That’s it for the installation. Run the EM makes sure everything is ok.
19. Test your URL’s from your
completion summary and everything is up and running.