Showing posts with label Oracle. Show all posts

Monday, 11 March 2019

Type of Database Connections / Services in Autonomous Data Warehouse

Autonomous Data Warehouse provides three database services that you can choose when connecting to your database. These are named as HIGH, MEDIUM, and LOW services and provide different levels of performance and concurrency.

The HIGH database service provides the maximum amount of CPU resources for a query, however this also means the number of concurrent queries you can run in this service will not be as much as the other services. The number of concurrent SQL statements that can be run in this service is 3, this number is independent of the number of CPUs in your database.

The MEDIUM database service provides multiple compute and IO resources for a query. This service provides more concurrency compared to the HIGH database service. The number of concurrent SQL statements that can be run in this service depends on the number of CPUs in your database and scales linearly with the number of CPUs.

The LOW database service provides the least amount of resources for a query, and any number of concurrent queries you can run in this service.
As a user you need to pick the database service based on your performance and concurrency requirements.

The typical screen looks like as below,

If you need any further details, kindly leave your comments below.. Happy blogging.. :)

Tuesday, 21 January 2014

What is ORACLE_HOME & ORACLE_BASE..??

What is ORACLE_BASE used for?
  • The ORACLE_BASE is also an environment variable to define the base/root level directory where you will have the Oracle Database directory tree - ORACLE_HOME defined under the ORACLE_BASE directory.
  • Basically, The ORACLE_BASE directory is a higher-level directory, than ORACLE_HOME, that you can use to install the various Oracle Software Products and the same Oracle base directory can be used for more than one installation.

What is ORACLE_HOME used for?

  • The ORACLE_HOME is an environment variable which is used to set and define the path of Oracle Home (server) Directory.
  • The ORACLE_HOME directory will have the sub directories, binaries, executables, programs, scripts, etc. for the Oracle Database.
  •  This directory can be used by any user who wants to use the particular database.
  • If the ORACLE_HOME variable is defined as an environment variable, then during the installation process, the Oracle Home Path will be set to the directory defined as default. If the variable is not defined, then the Oracle will take its own default location. i.e. The ORACLE_HOME variable does not have to be preset as an environment variable, it can be set during the installation process.
  • Basically The ORACLE_HOME variable is in the following ORACLE_BASE directory:
    ORACLE_HOME=$ORACLE_BASE\product\11.2.0

If no profile file is set with environment variables, then physically also be set as follows:

C Shell:
% setenv ORACLE_BASE /oracle/app
% setenv ORACLE_HOME /oracle/app/product/11.2.0

On Windows Systems:
My Computer -> Properties -> Advanced -> Environment Variables -> System Variables -> New/Edit/Delete (to set the variables)

Another way to physically set the variables as follow at the DOS prompt:
C:\> set ORACLE_HOME=C:\oracle\app\product\11.2.0
C:\> echo %ORACLE_HOME%

After setting the environment variables as above, open a fresh CMD tool and check whether they set properly or not. Do not try on already opened CMD tool to make sure the variables set or not.

Note: If you did not set the ORACLE_BASE environment variable before starting OUI, the Oracle home directory is created in an app/username/directory on the first existing and writable directory from /u01 through /u09 for UNIX and Linux systems, or on the disk drive with the most available space for Windows systems. If /u01 through /u09 does not exist on the UNIX or Linux system, then the default location is user_home_directory/app/username.

Or in Windows box, if you are having C, D and E drive then by default installation will be done on Last drive available, here is E drive.

Wednesday, 8 January 2014

Oracle Data Integrator 11.1.1.7.0 (ODI) Step By Step Installation On Windows 7 x86_64-Bit

Prerequisites

  • You must use the 64-bit version of JDK or JRockit to install on 64-bit machines. On Windows, the location of the JDK must be on the same drive as the installers.
  • In the previous post I have posted the steps RCU installation for Oracle Data Integration for 11.1.1.7.0 verson. We can take this as a continuation of that post. Please follow all the prerequisites before going to ODI 11g installation.
  • One Application Server.
Download the ODI 11g (11.1.1.7.0) from Oracle eDelivery or from the below link:


If you have not done already, please download ODI 11g installation files. Please make sure all the zipped files have downloaded correctly and unzipped into a single folder. Make sure that, no spaces are there in the folder path where setup files are located.

To start the installer, go to the directory where you unpacked the archive file and switch to the Disk1 directory.
cd unpacked_archive_directory\Disk1                  
setup.exe -jreLoc JRE_LOCATION                      

The installer requires the full path to the location of a Java Runtime Environment (JRE) on your system, which must be specified using the -jreLoc parameter.

My java is installed on C:\Java path, so here is the command to start the ODI installer..
Note:
  • If you installed Oracle WebLogic Server, a JRE was installed on your system in the jdk_version directory inside the Middleware home. You can use this location as the JRE_LOCATION to start the installer.
  • If you are using IBM WebSphere as your Application Server, you must provide the full path to a certified JRE installed on your system.
Step 1. Oracle Universal Installer will start the OBIEE 11g setup screen.

Click 'Next' with the below Welcome screen.

Step 2.  Select the method you want to use for obtaining software updates, or select Skip Software Updates if you do not want to get updates.
If updates are found, the installer will automatically apply them at this point. Some updates will require the installer to automatically be restarted; if this happens, the Install Software Updates screen will not be seen the next time.


Step 3. The Oracle Data Integrator installer provides the following installation options; you can select any combination of these options during the installation:
  • Developer Installation: 
This installation includes the ODI Studio and the Oracle Data Integrator Software Development Kit (SDK).
Note that this installation does not include the Standalone Agent or the scripts for managing sessions or scenarios from the command line. If a Standalone Agent will be needed, select Standalone Installation in addition to Developer Installation.
  • Standalone Installation:
This installation includes an Oracle Data Integrator standalone agent.
  • Java EE Installation:
This installation includes the Java EE agent, Oracle Data Integrator Console, and Public Web Services.
Here, i have selected all the components except ODI Standalone Agent.

Step 4. The installer checks for system prerequisites such as operating system certification, recommended operating system packages, and physical memory. If there is a problem, a short error message appears and you will have an opportunity to correct the issue before continuing the installation.

Step 5. This screen allows you to specify the absolute path for the Oracle home location.

NOTE - The specified Oracle home directory must be an empty directory or an existing Oracle Data Integrator home location.

If you selected Java EE Installation on the Select Installation Type screen, you will also be asked to provide the location of your Middleware home.

I have installed Weblogic already on my machine that comes with OBIEE. So, I'm giving here "OBIEE Middleware" location as "Oracle Middleware Home".

It will automatically populate the Oracle Home Directory as Oracle_OD1 within that Middleware Home location.


Step 6. Select the application server you want to use for your Java EE components.
As I have installed OBIEE 11.1.1.7.0, I used the Weblogic server as my Application Server.

Step 7. This screen allows you to select whether you want to configure the Oracle Data Integrator Studio and the Standalone Agent with an existing Master and Work Repository pair.
  • Configure Repositories:
This option creates a connection to a work repository for the Oracle Data Integrator Studio. It also configures the odiparams file for the Standalone Agent to connect the master repository. The agent definition is declared in the topology and corresponding agent startup scripts and shortcuts are created. With this configuration, the standalone agent can be started with no additional configuration.
Select this option if you have existing 11g Master and Work Repositories. 
  •  Skip Repository Configuration:
Select this option to continue with the Oracle Data Integrator installation without configuring the repositories. Once installed, you can use the Oracle Data Integrator Studio JDev Gallery to create or configure the repositories.
NOTE: Select Skip Repository Configuration if:
  • Your database is not supported by Oracle's Repository Creation Utility (RCU). You will need to configure these components manually after the installation. For more information see Appendix E, "Creating Repositories with Oracle Data Integrator Studio".
  • Your schemas have not yet been upgraded to the latest release.
If you have already done with the RCU Installation for ODI, select Configure Repositories.

Step 8. This screen allows you to specify the connection string to the database that hosts the Master Repository and the database user name and password.


Step 9. This screen allows you to specify the password for the Supervisor user. This is the same password specified on the Custom Variables screen when you ran RCU to create the schemas.

Displays the ODI username with Supervisor privileges. This field cannot be edited.

Note that the user name is SUPERVISOR (all CAPS) and ODI user names are case-sensitive. When you are asked to provide the Supervisor name later (for example, in ODI Studio), you must enter the name exactly at it appears here (SUPERVISOR), in all CAPS.


Step 10. This screen allows you to select an existing Work Repository from the list.

Step 11. This screen allows you to verify the installation options you selected. Click Install to begin the installation.

Step 12. This screen allows you to see the progress of the installation.

Step 13. This screen allows you to see the progress of any post-installation configuration tasks you may have selected.

Step 14. Click Save to save your configuration information to a file. This information includes port numbers, installation directories, disk space usage, URLs, and component names which you may need to access at a later time.
After saving your configuration information, click Finish to dismiss the installer.

Monday, 6 January 2014

Oracle Data Integrator 11.1.1.7.0 (ODI) RCU Installation

Installing a Database

Oracle Data Integrator stores information in a repository that is stored in a database schema. The Repository Creation Utility (RCU) is able to create the schema and the repository in the database. RCU supports Oracle, Microsoft SQL Server and IBM DB2 databases and supports the installation of a Master Repository and Work Repositories into a single schema.

If you have installed database already on your system, you can simply skip this section.

Before we starting the installation of RCU, we need to choose that which database we are going to use in our application. Here I am giving how to run RCU in Oracle database on our local machine. It is good to install Oracle Database Enterprise Edition to take full advantage of database for data types like spatial data or features like OLAP.

Prerequisites:

Here I am giving the installation steps that how I have installed RCU in my windows 32bit Operating system. If you have 64 bit OS, no worry the steps are same.

    Minimum of 4GB RAM required, 3 GB RAM would work but, system would be slow.

    Minimum of 10GB hard disk memory required.

    Do not use any directory name with space while installing/working with Oracle DB and OBIEE 11g.

Using RCU to Create the Database Schema

Oracle Data Integration 11g (11.1.1.7.0) is now standardized with Oracle Fusion Middleware and hence leverage database for metadata storage just like any other middleware product. So here we are going to install ODI 11g metadata schema on oracle database you just installed and configured. Same process can be leveraged to install metadata schema on other supported databases as well.
If you have not done already, please download RCU installation files from below URL:


Locate Required Additional Software's:

Please make sure all the zipped files have downloaded correctly and unzipped into a single folder and no any spaces in the folder path where setup files are located..

Now we will start the installation of metadata schema using Repository Creation Utility (RCU).

From unzipped folder for RCU, run rcu.bat file to start the Repository Creation Utility: 
For this practice, rcu.bat file is located under E:\Softwares\ODI\rcuHome\BIN directory.

Step 1. RCU utility will launch the GUI based wizard to guide you through the steps. Click Next to continue.

Step 2. Select Create from the below screen and click Next.

Step 3. In the below step Make sure database type is Oracle Database and enter following information to continue.

Step 3.1. Since we are using oracle database, RCU will show a warning message that you can just ignore and can continue the installation.

Step 3.2. Click OK to continue once RCU validates and initializes database configuration.

Step 4. In the next step it will ask for the prefix to create the metadata schema. By default, it is showing 'DEV'. If we want to change the prefix we can  change it. From the below window select appropriate schema which we need to install. I have selected only two which is showing in the screenshot.

Step 5. Click 'Next' from the above screen to create schema and the click 'OK' once RCU shows schema creation prerequisites check completed.

Step 6. In the next step, Enter password for both the schema as you like with the password conditions (such as alphabet, numeric and with special character) and click 'Next' to continue.

Step 7. On the Custom Variables screen, provide the following information as described as follows,
Master Repository ID: A specific ID for the new Master Repository. Master Repository ID values must be between 0 and 899. Default value is 001.

Supervisor Password: Password of the Supervisor user. You must confirm this password on the following line.

Work Repository Type:
Specify how the Work Repository will be used:
  • Use Development (D) for creating a development repository. This type of repository allows management of design-time objects such as data models and projects (including interfaces, procedures, etc.) A development repository also includes the run-time objects (scenarios and sessions). This type of repository is suitable for development environments.
D is the default work repository type.
  • Use Execution (E) for creating an execution repository: This type of repository only includes run-time objects (scenarios, schedules and sessions). It allows launching and monitoring of data integration jobs in Operator Navigator. Such a repository cannot contain any design-time artifacts. Designer Navigator cannot be used with it. An execution repository is suitable for production environments. 
Work Repository ID: A specific ID for the new Work Repository. Default value is 001.

Work Repository Name: A unique name for the Work Repository. Default is WORKREP.

Work Repository Password: Provide a password for the Work Repository.

Step 8. Click 'Next' with the above step to have RCU create the selected schema.

Step 8.1. Click 'OK' to continue creation of tablespace.

Step 8.2. Once tablespace created, click 'OK' to continue.

Step 9. Now RCU will create required schema objects within the tablespace just created. So Click 'Create' with next step and continue.

Step 10. Click 'Close' to finish RCU wizard once schema are created successfully.

 With the above step the installation of RCU is completed.

Note:
Remember the password which we have given for all the users/schema so far and we will continue to use the same password. We will need this password for ODI installation as well to let ODI installer knows where the metadata schema located and what is the password to connect to the schema. Now we can log-in to the oracle database and can whether this schema (DEV_ODI_REPO) is available.


Thursday, 26 September 2013

Oracle Group by clause along with ROLLUP or CUBE operators


Use the ROLLUP OPERATOR to produce subtotal values, ROLLUP IS AN EXTENSION OF GROUP BY CLAUSE, Use the CUBE OPERATOR to produce cross-tabulation values.  Use the GROUPING function to identify the row values created by ROLLUP or CUBE.  These operators and GROUPING function can best be used ALONG WITH GROUP FUNCTIONS, as group functions operate on a set of rows to give one result per group.

  • Examples of Rollup:

          1. SELECT e.department_id, SUM(e.salary)
                       FROM employees e
                                   WHERE e.department_id < 30 
                                                 GROUP BY ROLLUP(e.department_id);
             Results:

          2. SELECT e.department_id, e.job_id, SUM(e.salary) 
                         FROM employees e
                                     WHERE e.department_id < 30 
                                                    GROUP BY ROLLUP(e.department_id, e.job_id);
              Results: 

  •    Example of CUBE:

The cube operator is used to produce results sets that are typically used for cross-tabular reports. This means Rollup produces only one possible subtotaling where as Cube produces subtotal for all possible conditions of grouping specified in the group by clause and a grand total.


       1. SELECT e.department_id, SUM(e.salary) 
                          FROM employees e
                                      WHERE e.department_id < 30 GROUP BY CUBE(e.department_id);
           Results:

      2. The following query produces subtotaling results based on job, based on deptno and based on the                 individual jobs(clerk or analyst or manager etc in dept 10 and 20)  


          SELECT e.department_id, e.job_id, SUM(e.salary)
                         FROM employees e
                                     WHERE e.department_id < 30 GROUP BY CUBE(e.department_id, e.job_id);

          Results:


          Monday, 2 September 2013

          Joins in Oracle with examples

          1. The purpose of a join is to combine the data across tables.

          2. A join is actually performed by the where clause which combines the specified rows of tables.

          3. If a join involves in more than two tables then oracle joins first two tables based on the joins condition and then compares the result with the next table and so on.

          Types:
          1. Equi join
          2. Non-equi join
          3. Self join
          4. Natural join
          5. Cross join
          6. Outer join
            • Left Outer join
            • Right Outer join
            • Full Outer join
                7. Inner join
                8. On clause
                9. Using clause

          Assume that, we have following tables in Oracle.

          SQL> select * from dept;

          SQL> select * from emp;

          1. Equi Join: 

          A join which contains an equal to ‘=’ operator in the joins condition.

          SQL> select empno,ename,job,dname,loc from emp e,dept d where e.deptno=d.deptno;


          2. Non-Equi Join:

          A join which contains an operator other than equal to ‘=’ in the joins condition.

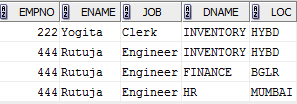
          SQL> select empno,ename,job,dname,loc from emp e,dept d where e.deptno > d.deptno;


          3. SELF JOIN

          Joining the table itself is called self join.

          SQL> select e1.empno,e2.ename,e1.job,e2.deptno from emp e1,emp e2 where e1.empno=e2.mgr;


          4. NATURAL JOIN

          Natural join compares all the common columns.

          SQL> select empno,ename,job,dname,loc from emp natural join dept;


          5. CROSS JOIN

          This gives the cross products.

          SQL> select empno,ename,job,dname,loc from emp cross join dept;


          6. OUTER JOIN

          Outer join gives the non-matching records along with matching records.

          • LEFT OUTER JOIN
                     This will display the all matching records and the records which are in left hand side table those that are not in right hand side table.

          SQL> select empno,ename,job,dname,loc from emp e left outer join dept d on(e.deptno=d.deptno);               OR

          SQL> select empno,ename,job,dname,loc from emp e,dept d where e.deptno=d.deptno(+);


          • FULL OUTER JOIN
          This will display the all matching records and the non-matching records from both tables.


          7. INNER JOIN

          This will display all the records that have matched.

          SQL> select empno,ename,job,dname,loc from emp inner join dept using(deptno);


          8. Using Clause

          SQL> select empno,ename,job ,dname,loc from emp e join dept d using(deptno);


          9. On Clause:

          SQL> select empno,ename,job,dname,loc from emp e join dept d on(e.deptno=d.deptno);